Manual
Overview
- Installation
- Start application
- Direct debits
- Credit transfers
- Entering a license no.
- Command-line interface
Installation
Get SEPAApp simply by clicking here to download and save the file anywhere. Then extract the contents (it is a ZIP archive with the SEPAApp as well as the templates in CSV, ODF and Microsoft Excel ® format (.csv / .ods / .xls / .xlsx) into any directory on your computer.
Start application
Start SEPAApp by double clicking on the file SEPAApp.exe (Windows) or SEPAApp.command (Mac) or SEPAApp.sh (Linux, Unix). On Macs (only) the first start has to be done via right-click or Ctrl+click and opening via the menu.
If a warning appears (at least at the first start with Windows or Mac), you may ignore it (see also FAQ: I get a warning message after starting SEPAApp – what does that mean?).
If you use the SEPAApp version without Java-Runtime Environment, the file on Mac is called SEPAApp.jar. The file SEPAAppConsole.exe (Windows) is used for the Command-line interface. With other operating systems the Command-line interface is accessible via the files SEPAApp(.app) i.e. SEPAApp.jar.
Direct debits
When starting SEPAApp the first tab is the one with the heading “Direct Debit” and it is already selected (Fig. 1 ).
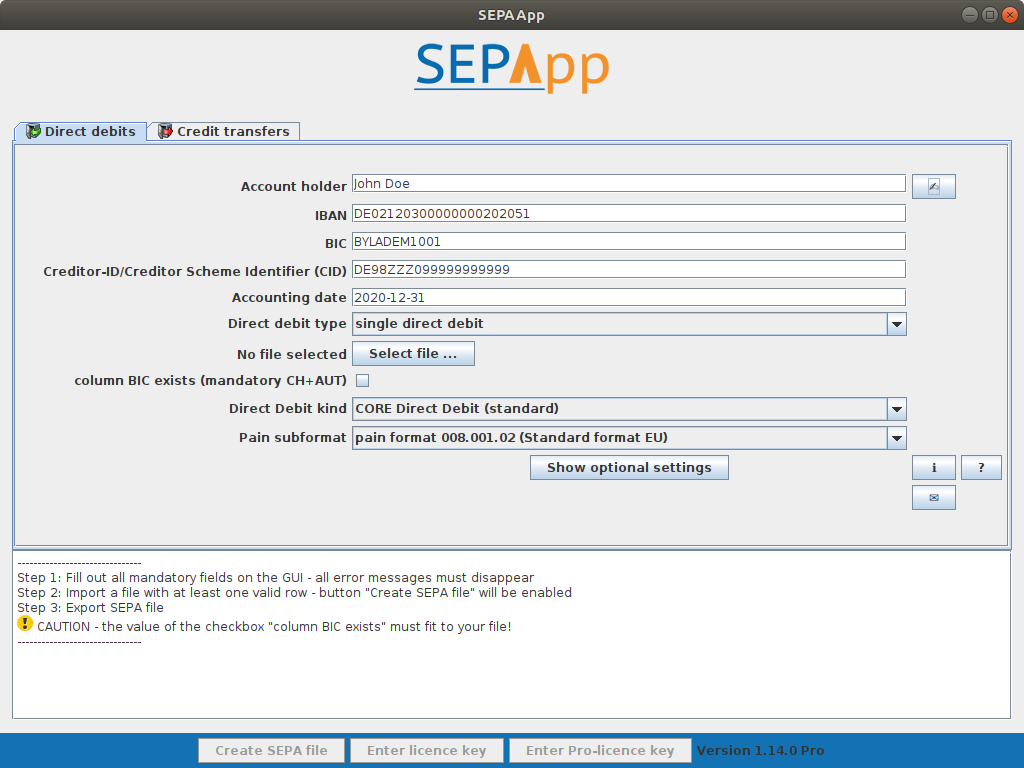
Fig. 1
Enter your own bank data
Now enter your own banking information in the fields:
- Account holder: The first and last name or the business name of the account holder
- IBAN: your IBAN (with or without spaces)
- BIC: your BIC (with or without spaces)
- creditors ID: Your creditors ID (you get your creditors ID from your bank)
- Debit Date: The date on which the debit is to be executed. This date must be in the future.
- Debit Type: Here you have a choice between
- SINGLE: A one-time debit, for example, a one-time purchase or a fee for a course.
- FIRST: The first debit in a series of debits, e.g. the first membership fee, which is collected annually. Hint: With some banks you may start a sequence of direct debits also with SEQUENCE.
- SEQUENCE: Another debit in a series of debits, e.g. the second or third membership fee, which is collected annually.
- LAST: The last debit of a sequence of debits, e.g. last membership fee, which is finally collected.
- If you want to import the BIC of your direct debits, set the according checkbox to true.
- Direct debit kind: Choose between standard direct debits (CORE), business direct debits (B2B) or express direct debits (COR1/D1-agreement) (outdated)
- Choose pain-Format: Choose the (sub-)format according to your country and the requirements of your bank.
Choose account – dialog
By clicking on the button next to the field account holder, you open the Choose account – dialog. Here you may enter several accounts and choose the one you need (see Fig. 2). The data will be taken to the main window. This feature is only available for SEPAApp Pro!
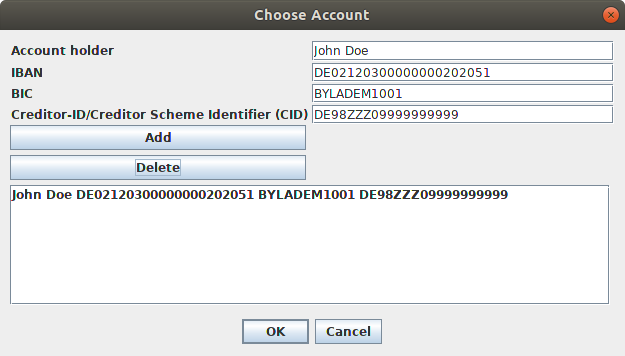
Fig. 2
Show the optional settings
By clicking on the button “Show optional settings” you open a window with additional, rarely needed settings (see the following list of optional settings and Fig. 3):
- optional Here you can choose a value for the field “Category Purpose”. Only choose a value, if you need that field (your bank may tell you).
- optional Identification ID: This field is only relevant for example in Spain and may be filled with the Fiscal No. Leave it empty in all other cases!
- optional Choice type of identification ID: Choose organization (e.g. Spanish Fiscal No. or Irish OIN) or person (z.B. Irish OIN). This choice is only relevant, if the field identification ID is used.
- optional Checkbox timestamp without timezone: Choose this only if your bank need the timestamp within the SEPA XML file without timezone. This choice is only relevant for the (sub-)format pain.008.001.02.
- optional Checkbox Generate Customer’s reference automatically (EndToEndId): De-Select this checkbox, if you do not need a generated Id. This checkbox is selected by default, because many banks need this Id.
- optional Checkbox: Read Customer’s reference from import file (EndToEndId): Select this checkbox, if you want to import the id from file for each single (!) data row. This feature is only available for SEPAApp Pro!
- optional Customer’s referenz (EndToEndId): Enter your manual id for all (!) data rows here. To enable this field both checkboxes above must be de-selected.
- optional Choice Batch-Booking: Select “no”, if you need single booking, select “yes”, if you need batch booking.
- optional Checkbox transaction no.: Select this checkbox, if you need a transaction no. (InstrId) for each transaction.
- optional Checkbox Payment Information Instruction: Select this checkbox, if you need a separate header (Payment Information Instruction) for each transaction. This choice is NOT relevant for the (sub-)format CBI.
- optional Currency: Enter the currency for all payments. This feature is not supported for sub formats 001.02.CH.01 and 003.02.
- optional Checkbox Read Currency from import file: This enables the import of the currency from the optional column of the import file. This feature is not supported for sub formats 001.02.CH.01 and 003.02. This feature is only available for SEPAApp Pro!
- optional Checkbox Read address from import file: This enables the import of the optional columns country code, address line 1 and address line 2 from the import file. This feature is only available for SEPAApp Pro!
- optional Choice Charge Bearer: Sets the charge bearer to one of the following values: Creditor, Debtor, Shared between Creditor and Debtor, According Service Level Agreement. This feature is only supported for sub formats 008.001.02 and 008.001.02.austrian.003/004. This feature is only available for SEPAApp Pro!
- optional Payment-ID: Enter your payment-ID for the complete file here.
- optional Checkbox Read accounting date from import file: This enables the import of the optional column Accounting date from the import file. This feature is only available for SEPAApp Pro!
- optional Checkbox XML Schema Location: This adds the Schema Location to the XML header. This choice is only relevant for the (sub-)format pain.008.003.02.
- optional Checkbox Direct debit type from import file: This enables the import of the optional column Direct debit type from the import file. This feature is only available for SEPAApp Pro! Allowed values are “FIRST” for first direct debit, “SEQUENCE” for sequence direct debit, “SINGLE” for single direct debit and “LAST” for last direct debit.
- optional Checkbox Convert text to SWIFT character set: This setting lets SEPAApp convert all texts i.e. not-allowed special characters to the SWIFT character set.
- optional Checkbox Allow special characters and umlauts: This setting allows SEPAApp to import special characters and umlauts allowed in Germany or Austria.
- optional Checkbox BDD: If the subformat pain.008.02.CH.03 is used, this checkbox activates the BDD mode (business direct debit). In this case no creditor ID is needed and instead of a BIC the Clearing System ID and the Member ID (separated with a space) is used.
- optional Checkbox Allow special characters CH: This setting lets SEPAApp accept the extend SWIFT character set (Switzerland).
- optional Split file after x payments: With this setting the payment file will be split after the number of payments entered in this field. This feature is only available for SEPAApp Pro!
- optional Checkbox Add software and vendor name: This setting adds the software name and the vendor name to the file header.

Fig. 3
Reset/save/load settings
You may change the settings with the according buttons:
- reset: resets all settings to standard/delivery
- save: saves all settings to the file “sepaapp.sdd.config” in the SEPAApp directory (own data such as account holder, IBAN, BIC, creditors ID, debit date, EndToEndId, Payment-ID or Identification-ID will be saved as XXX)
- load: loads all settings from the file “sepaapp.sdd.config” in the SEPAApp directory
CSV file creation (with LibreOffice/OpenOffice)
If you want to use a CSV file to import your direct debits in SEPAApp, you can see here how the CSV file must be constructed. This is shown with LibreOffice / OpenOffice. You can also create the CSV file with any other program. If you want to work with the Excel format, then you can skip this part and read the next chapter. The CSV file must be in the following Fig. 1 shown columns. The number of lines is not limited – you can import any number of direct debits (rows) in SEPAApp. The columns contain:
- Account holder: The first and last name or the business name of the account holder to be debited from his account.
- IBAN: IBAN (with or without spaces), the account of which is to be debited.
- OPTIONAL: BIC: BIC (with or without spaces), the account of which is to be debited. The according checkbox on the SEPAApp GUI must be set to true, if you want to use the BIC.
- Mandate reference number: The mandate reference no. is a unique number that identifies the direct debit. Note: The uniqueness will not be checked by SEPAApp!
- Signature Date: The date on which the direct debit (Permission) has been issued. This date must be in the past.
- Usage: The text that will appear when booking (on the bank statement).
- Amount: The amount to be transferred.
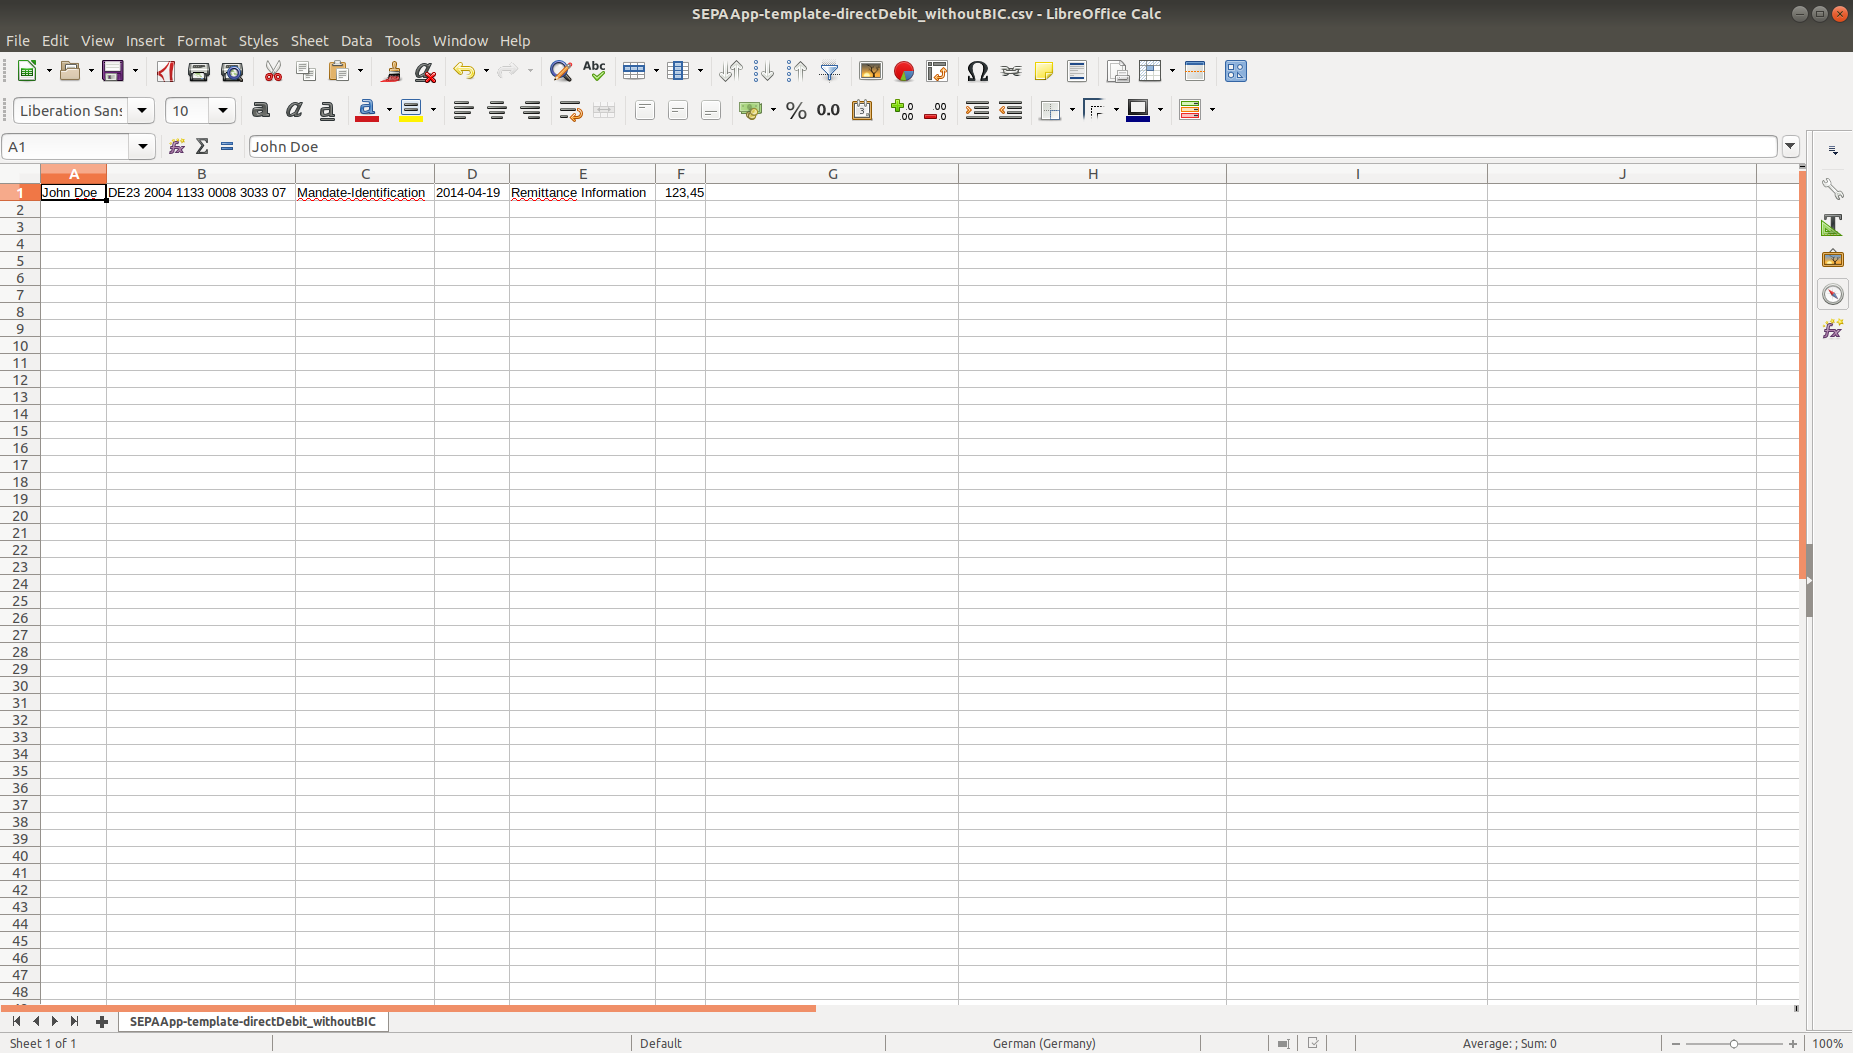
Fig. 1
Save the file as a CSV file as shown in Fig 2 shown and check the option “edit filter settings”:
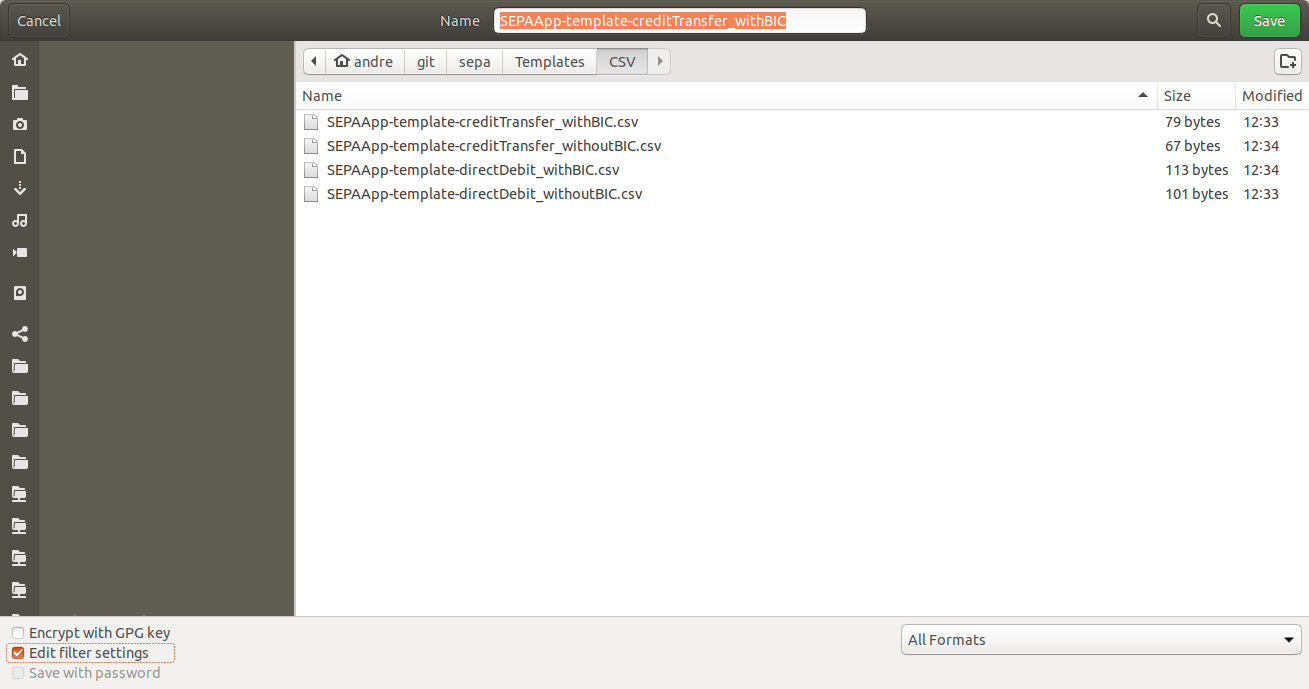
Fig. 2
Select in the dialog (Fig. 3), the semicolon (;) as the delimiter and uncheck the option “cell content as shown”.
Caution when selecting the character set:
- In Windows, select the character set “Western Europe”
- In Linux, select the character set “UTF-8”
- In Mac OS, select the character set “UTF-8”
Otherwise, it may cause problems in the processing of special digits.
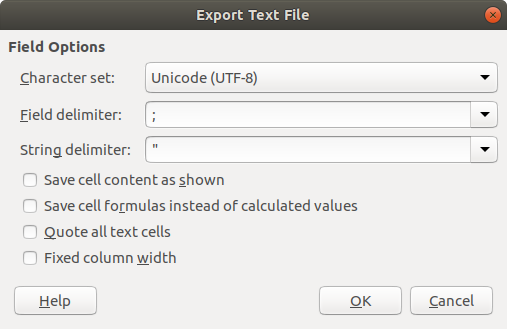
Fig. 3
You can download template files here: SEPAApp-template-directDebit_without BIC (CSV) SEPAApp-template-directDebit_with BIC (CSV)
Excel file creation (with Microsoft Excel) / ODF file creation with LibreOffice / OpenOffice
If you want to use a CSV file to import your direct debits in SEPAApp, please read the previous chapter and then skip this. Use the included templates (within the downloaded zip file) for Excel 2003 (*.xls) or Excel 2007 or newer (*.xlsx) or LibreOffice / OpenOffice (ODF format: *.ods) to capture your direct debits and credit transfers. The advantage compared to CSV files is that you get assistance within the templates as the respective columns to be filled.
Hint: Do not delete header or example rows or eventually the not needed table in the template. Just insert your data – SEPAApp will automatically recognize your data.
![]()
(Fig. 1)
You can download template files here: SEPAApp-Template_without_BIC (XLS) SEPAApp-Template_without_BIC (XLSX) SEPAApp-Template_without_BIC (ODS) SEPAApp-Template_with_BIC (XLS) SEPAApp-Template_with_BIC (XLSX) SEPAApp-Template_with_BIC (ODS)
Import CSV, ODF or Excel file into SEPAApp
Select in the following dialog (Fig. 1) your file with the direct debits and import this file by clicking on the button “Select File” (Fig. 2).
Fig. 1
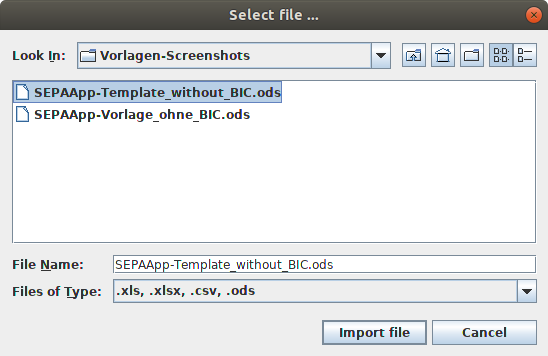
Fig. 2
After importing the file SEPAApp shows you whether all data was successfully imported, or if there were errors (Fig. 3).
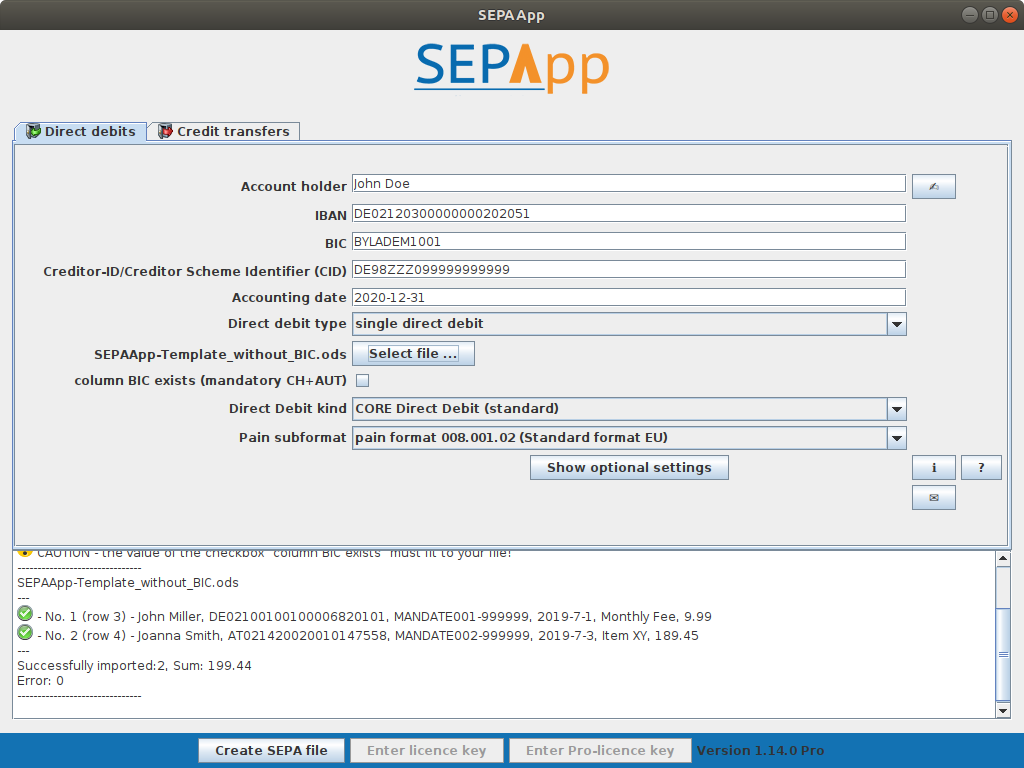
Fig. 3
Generate SEPA file
You create the SEPA file by clicking on the button “Create SEPA file” (Fig. 1) and enter the file name of the SEPA XML file in the following dialog and “Save File” click on the button (Fig. 2).
Fig. 1
Hint: The button “Create SEPA file” will be enabled, after all mandatory fields on the GUI are filled – i.e. there are error messages – and a file with at least one valid data row was imported.
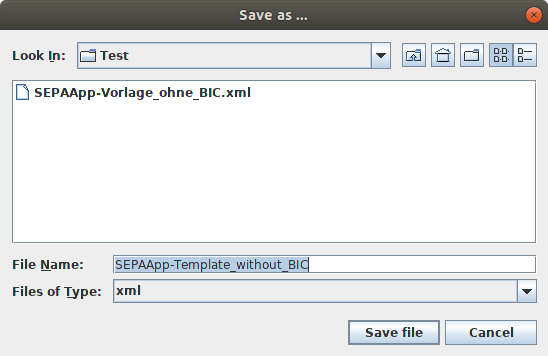
Fig. 2
After saving the file SEPAApp shows you whether the saving was successful or if there were errors (Fig. 3).

Fig. 3
Hint: Only successfully imported rows will be exported to the SEPA file. So please check the log messages according the imported rows before exporting a SEPA xml file!
Credit transfers
To generate credit transfers with SEPAApp, select after the start of the second tab with the heading “credit transfers” (Fig. 1), by clicking on it. This will open the view for transfers (Fig. 2).
Fig. 1
![]()
Fig. 2
Enter your own bank data
Now enter your own banking information in the fields:
- Account holder: The first and last name or the business name of the account holder
- IBAN: your IBAN (with or without spaces)
- BIC: your BIC (with or without spaces)
- Execution Date: The date on which the credit transfer is to be executed. This date must be in the future.
- If you want to import the BIC of your credit transfers, set the according checkbox to true.
- Choose pain-Format: Choose the (sub-)format according to your country and the requirements of your bank.
Choose account – dialog
By clicking on the button next to the field account holder, you open the Choose account – dialog. Here you may enter several accounts and choose the one you need (see Fig. 3). The data will be taken to the main window. This feature is only available for SEPAApp Pro!
Fig. 3
Show the optional settings
By clicking on the button “Show optional settings” you open a window with additional, rarely needed settings (see the following list of optional settings and Fig. 4):
- optional Here you can choose a value for the field “Category Purpose”. Only choose a value, if you need that field (your bank may tell you).
- optional Identification ID: This field is only relevant for example in Spain and may be filled with the Fiscal No. Leave it empty in all other cases!
- optional Choice type of identification ID: Choose organization (e.g. Spanish Fiscal No. or Iirish OIN) or person (e.g. Irish OIN). This choice is only relevant, if the field identification ID is used.
- optional Checkbox timestamp without timezone: Choose this only if your bank need the timestamp within the SEPA XML file without timezone. This choice is only relevant for the (sub-)format pain.001.001.03.
- optional Choice Batch-Booking: Select “no”, if you need single booking, select “yes”, if you need batch booking.
- optional Checkbox Generate Customer’s reference automatically (EndToEndId): De-Select this checkbox, if you do not need a generated Id. This checkbox is selected by default, because many banks need this Id.
- optional Checkbox: Read Customer’s reference from import file (EndToEndId): Select this checkbox, if you want to import the id from file for each single (!) data row. This feature is only available for SEPAApp Pro!
- optional Customer’s reference (EndToEndId): Enter your manual id for all (!) data rows here. To enable this field both checkboxes above must be de-selected.
- optional Checkbox Set debitor currency: Select this checkbox, if your bank needs this setting. This checkbox is not selected by default.
- optional Checkbox express credit transfer: Select this checkbox, if you want to generate an express credit transfer. Caution, you bank needs to support that option. This checkbox is not selected by default. This choice is only relevant for the (sub-)format pain.001.003.03.
- optional Checkbox transaction no.: Select this checkbox, if you need a transaction no. (InstrId) for each transaction.
- optional Checkbox Payment Information Instruction: Select this checkbox, if you need a separate header (Payment Information Instruction) for each transaction.
- optional Checkbox National Payment CH with currency CHF: Select this checkbox, if want to generate a national payment in Switzerland. Hint: The currency will be set to CHF by SEPAApp no matter what is in the import file. This choice is only relevant for the (sub-)format pain.001.001.03.CH.02.
- optional Checkbox set LclInstrm CORE: Select this checkbox, if want to set the according element in your SEPA XML file.This choice is only relevant for the (sub-)formats 001.03, 001.001.03.austrian.003, 001.03.CH.02.
- optional Currency: Enter the currency for all payments. This feature is not supported for sub format 003.03.
- optional Checkbox Read Currency from import file: This enables the import of the currency from the optional column of the import file. This feature is not supported for sub format 003.03. This feature is only available for SEPAApp Pro!
- optional Checkbox Read address from import file: This enables the import of the optional columns country code, address line 1 and address line 2 from the import file. This feature is only available for SEPAApp Pro!
- optional Choice Charge Bearer: Sets the charge bearer to one of the following values: Creditor, Debtor, Shared between Creditor and Debtor, According Service Level Agreement. This feature is only supported for sub formats 001.001.03, 001.001.03.austrian.003/004 and 001.03.CH.02. This feature is only available for SEPAApp Pro!
- optional Payment-ID: Enter your payment-ID for the complete file here.
- optional Checkbox Use ESR account number instead of IBAN: With this set the field IBAN will be used for an ESR account number both on the GUI as in the import file. This feature is only available for SEPAApp Pro!
- optional Checkbox Use ESR reference number instead of reason of payment: With this set the field Reason of payment will be used for an ESR reference number (in the import file). This feature is only available for SEPAApp Pro!
- optional Checkbox Read execution date from import file: This enables the import of the optional column Execution date from the import file. This feature is only available for SEPAApp Pro!
- optional Checkbox Bankgiro No. and ClearingSystem instead of IBAN and BIC: With this set the field IBAN will be used for a Bankgiro number and the field BIC will be used for a ClearingSystem both on the GUI as in the import file. This feature is only available for SEPAApp Pro! This choice is only relevant for the (sub-)format pain.001.003.03.
- optional Checkbox Remittance information as SCOR: With this set the field remittance information from the import file will be written to the field SCOR. This feature is only available for SEPAApp Pro! This choice is only relevant for the (sub-)format pain.001.003.03.
- optional Checkbox XML Schema Location: This adds the Schema Location to the XML header. This choice is only relevant for the (sub-)format pain.001.003.03.
- optional Checkbox Code URGP for Express credit transfer: This setting will add an URGP (urgent) code to express credit transfers. This is mandatory in Germany and Austria, but not available for (sub-)formats CBI and pain.0001.001.02.
- optional Checkbox Set Category Purpose for each transaction: With this set the category purpose will be added on transaction level. This choice is only relevant for the (sub-)format pain.001.001.03.
- optional Checkbox Instant credit transfer: With this set instant credit transfers will be created. This setting is not valid for the (sub-)formats CBI, pain.001.001.02 and pain.001.003.03.
- optional Checkbox Use account no. instead of IBAN: This setting allows you to use an account no. instead of an IBAN in the import file. This feature is only available for SEPAApp Pro!
- optional Choice Service Level SEPA: The required Service Level can be selected here.
- optional Checkbox Convert text to SWIFT character set: This setting lets SEPAApp convert all texts i.e. not-allowed special characters to the SWIFT character set.
- optional Checkbox Create PDF report: This setting creates a pdf report with all payments exported to the XML file including checksums for the XML file. This feature is only available for SEPAApp Pro!
- optional Checkbox QR invoice (Switzerland): This setting lets SEPAAApp check, if imported IBANs are QR-IBANs and write the remittance information as QR-reference and the “additional information” field into the according (QR-)fields in the SEPA XML file. This feature is only available for SEPAApp Pro!
- optional Checkbox Allow special characters and umlauts: This setting allows SEPAApp to import special characters and umlauts allowed in Germany or Austria.
- optional Checkbox Read payer from import file: This setting lets SEPAApp read account holder, IBAN, BIC for the payer/sending account from the import file. This choice is not available for the (sub-)format CBI. This feature is only available for SEPAApp Pro!
- optional Checkbox Set ADEB for SWIFT Confirmation: This sets the code ADEB to request a SWIFT confirmation from the executing bank. This choice is only relevant for the (sub-)format pain.001.001.03. This feature is only available for SEPAApp Pro!
- optional Checkbox Use account No. instead of IBAN from GUI: Use this checkbox, if you want to enter an account no. instead of an IBAN on the GUI.
- optional Debitor country code: Enter the debitors country code here, if you need this in your SEPA XML file.
- optional Checkbox Split Payments: This feature extracts invoice data from the remittance information in the following format: /VAT/[VAT amount]/IDC/[ID of issuer]/INV/[Invoice No.]/TXT/[Invoice Text]. This choice is only relevant for the (sub-)format pain.001.001.03. This feature is only available for SEPAApp Pro!
- optional Checkbox Allow special characters CH: This setting lets SEPAApp accept the extend SWIFT character set (Switzerland).
- optional Split file after x payments: With this setting the payment file will be split after the number of payments entered in this field. This feature is only available for SEPAApp Pro!
- optional Checkbox Account holder in file header: If this setting is selected, the account holder will be inserted in the file header.
- optional Country code: Enter the sender country code here, if you need it in your SEPA XML file.
- optional Address line 1: The address of the sender can be entered here (part 1). This function is only available in SEPAApp Pro!
- optional Address line 2: The address of the sender can be entered here (part 2). This function is only available in SEPAApp Pro!
- optional Checkbox Add software and vendor name: This setting adds the software name and the vendor name to the file header.
- optional Checkbox Add country code from IBAN to BIC: If this setting is selected, the country code of the IBAN will be added to the BIC. This function is only available in SEPAApp Pro!
- optional Checkbox Use structured address format: If this setting is selected, the data from address lines 1 and 2 is transferred to the fields streetname, postal code (address line 2 up to the first space) and town (address line 2 from the first space). This function is only available in SEPAApp Pro!
- optional Regulatory reporting code: The regulatory reporting code can be entered here. This function is only available in SEPAApp Pro!
- optional Checkbox Regulatory reporting code from file: If this setting is checked, the regulatory reporting code is read from the import file. This function is only available in SEPAApp Pro!
![]()
Fig. 4
Reset/save/load settings
You may change the settings with the according buttons:
- reset: resets all settings to standard/delivery
- save: saves all settings to the file “sepaapp.sct.config” in the SEPAApp directory (own data such as account holder, IBAN, BIC, execution date, EndToEndId, Payment-ID or Identification-ID will be saved as XXX)
- load: loads all settings from the file “sepaapp.sct.config” in the SEPAApp directory
CSV file creation (with LibreOffice / OpenOffice)
If you want to use a CSV file to import your credit transfers in SEPAApp, you can see here how the CSV file must be constructed. This is shown with LibreOffice / OpenOffice. You can also create the CSV file with any other program. If you want to work with the Excel format, then you can skip this part and read the next chapter. The CSV file must be in the following Fig. 1 shown columns. The number of lines is not limited – you can import any number of credit transfers (rows) in SEPAApp. The columns contain:
- Account holder: The first and last name or the business name of the account holder, should be transferred to their accounts.
- IBAN: IBAN (with or without spaces) of the account to which is to be transferred.
- OPTIONAL: BIC: BIC (with or without spaces) of the account to be transferred to. The according checkbox on the SEPAApp GUI must be set to true, if you want to use the BIC.
- Usage: The text that will appear when booking (on the bank statement).
- Amount: The amount to be transferred.
![]()
Fig.1
Save the file as a CSV file as shown in Fig. 2 and check the option “edit filter settings”:
Fig. 2
Select in the dialog (Fig. 3), the semicolon (;) as the delimiter and uncheck the option “cell content as shown”.
Caution when selecting the character set:
- In Windows, select the character set “Western Europe”
- In Linux, select the character set “UTF-8”
- In Mac OS, select the character set “UTF-8”
Otherwise, it may cause problems in the processing of specail digits.
Fig. 3
You can download template files here: SEPAApp-template-creditTransfer_without BIC (CSV) SEPAApp-template-creditTransfer_with BIC (CSV)
Excel file creation (with Microsoft Excel) / ODF file creation with LibreOffice / OpenOffice
If you want to use a CSV file to import your credit transfers in SEPAApp, please read the previous chapter and then skip this. Use the included templates (within the downloaded zip file) for Excel 2003 (*.xls) or Excel 2007 or newer (*.xlsx) or LibreOffice / OpenOffice (ODF format: *.ods) to capture your direct debits and credit transfers. The advantage compared to CSV files is that you get assistance within the templates as the respective columns to be filled.
Hint: Do not delete header or example rows or eventually the not needed table in the template. Just insert your data – SEPAApp will automatically recognize your data.
![]()
(Fig. 1)
You can download template files here: SEPAApp-Template_without_BIC (XLS) SEPAApp-Template_without_BIC (XLSX) SEPAApp-Template_without_BIC (ODS) SEPAApp-Template_with_BIC (XLS) SEPAApp-Template_with_BIC (XLSX) SEPAApp-Template_with_BIC (ODS)
Import CSV, ODF or Excel file into SEPAApp
Select in the following dialog (Fig. 1) your file with the direct debits and import this file by clicking on the button “Select File” (Fig. 2).
![]()
Fig. 1
Fig. 2
After importing the file SEPAApp shows you whether all data were successfully imported, or if there were errors (Fig. 3).
![]()
Fig. 3
Generate SEPA file
You create the SEPA file by clicking on the button “Create SEPA file” (Fig. 1) and enter the file name of the SEPA XML file in the following dialog and “Save File” click on the button (Fig. 2).
![]()
Fig. 1
Hint: The button “Create SEPA file” will be enabled, after all mandatory fields on the GUI are filled – i.e. there are error messages – and a file with at least one valid data row was imported.
Fig. 2
After saving the file SEPAApp shows you whether the save was successful or if there were errors (Fig. 3).
![]()
Fig. 3
Hint: Only successfully imported rows will be exported to the SEPA file. So please check the log messages according the imported rows before exporting a SEPA xml file!
Entering a license no.
Order your license no. here – You can get this comfortable by e-mail. Enter the license no. afterwards in SEPAApp by clicking on the button “Enter license key” in Fig. 1, in the opening dialog window and confirm by clicking on the “OK” button (Fig. 2).
Entering a Pro license no. is like entering a Standard license no. but using the other button. After entering a Pro license no. it is not possible and not necessary to enter a Standard license no., too. You only have to enter a Pro license no., if you want to use Pro features (Fig. 2).
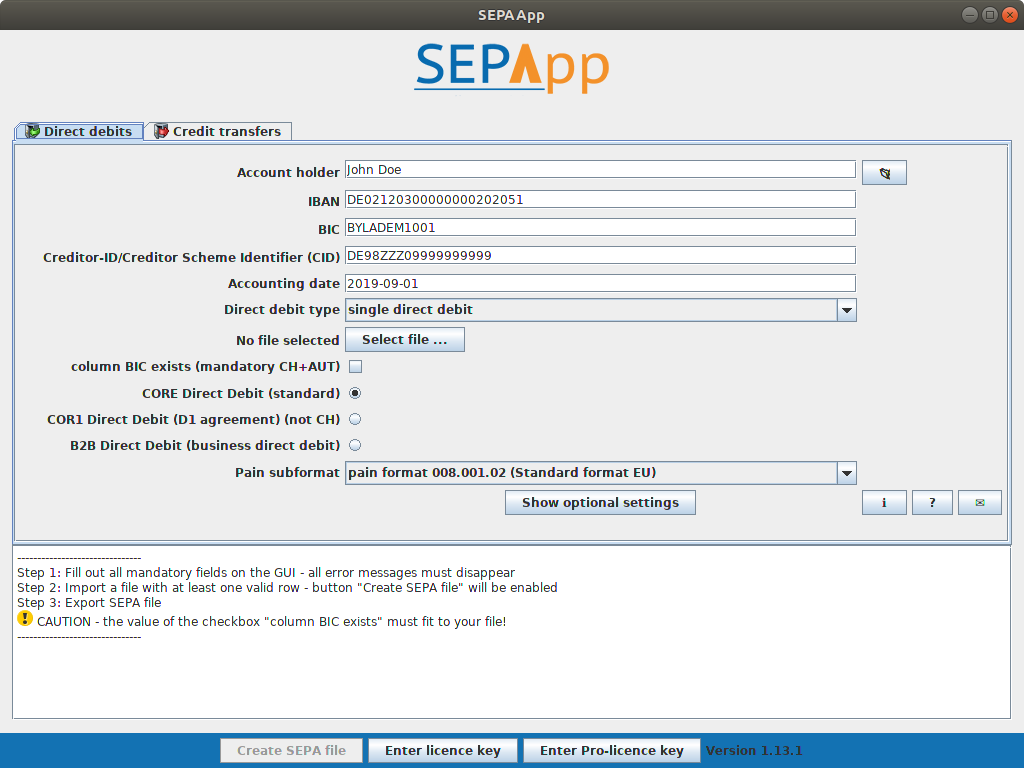
Fig. 1

Fig. 2
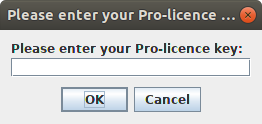
Fig. 3
Command-line interface
This feature is only available for SEPAApp Pro!
Use SEPAAppConsole.exe for command-line usage under Windows instead of SEPAApp.exe. Under Mac, Linux and Unix use SEPAApp(.app) i.e. SEPAApp.jar (not SEPAApp.sh!) for command-line usage.
Credit Transfers
SEPAAppConsole.exe SCTx [configFileName] [importFileName] [exportFileName]
- [configFileName] You can create the config file in the window “Optional settings” according you actual configuration on the GUI.
or
SEPAAppConsole.exe SCT [accountHolder] [IBAN] [BIC] [executionDate] [subformat] [flagForBICImport] [flagForEndToEndIdImport] [flagForCurrencyImport] [flagForAddressImport] [flagForUseOfESRAccountNo] [flagForExecutionDateImport] [flagForUseBankgiroNo] [flagForUseAccountNoInsteadOfIBAN] [flagForConvertTextToSWIFTCharacterSet] [flagForQrInvoice] [flagForAllowSpecialCharactersAndUmlauts] [flagForPayerImport] [flagForUseAccountNoInsteadOfIBANFromGUI] [flagForSplitPayment] [flagForAllowSpecialCharactersCH] [flagForRegulatoryReportingCodeFromFile] [importFileName] [exportFileName]
- Subformat = PAIN_001_001_03 or PAIN_001_003_03 or CBIPaymentRequest or PAIN_001_001_03_CH_02 or PAIN_001_001_03_AUSTRIAN_003 or PAIN_001_001_02 or PAIN_001_001_03_AUSTRIAN_004
- flagForBICImport = true or false, flagForEndToEndIdImport = true or false, flagForCurrencyImport = true or false, flagForAddressImport = true or false, flagForUseOfESRAccountNo = true or false, flagForExecutionDateImport = true or false, flagForUseBankgiroNo = true or false, flagForUseAccountNoInsteadOfIBAN = true or false, flagForConvertTextToSWIFTCharacterSet = true or false, flagForQrInvoice = true or false, flagForAllowSpecialCharactersAndUmlauts = true or false, flagForPayerImport = true or false, flagForUseAccountNoInsteadOfIBANFromGUI = true or false, flagForSplitPayment = true or false, flagForAllowSpecialCharactersCH = true or false, flagForRegulatoryReportingCodeFromFile = true or false
- optional (“” for empty/not used):
(Category Purpose (only values from selectbox allowed) (Identification ID) (true/false: Identification ID is person) (true/false: Identification ID is organisation) (true/false: TimeZone in Timestamp) (true/false: Generate Customer's referenz automatically (EndToEndId)) (Customer's referenz (EndToEndId)) (Batch Booking (EMPTY, YES, NO)) (true/false: Set debitor currency (true/false: express credit transfer (CCU/DTE)) (true/false: Set transaction no.) (true/false: Payment Information Instruction for each payment) (true/false: National Payment CH with currency CHF) (true/false: set LclInstrm CORE) (Currency) (ChargeBearer (EMPTY, CRED, DEBT, SHAR, SLEV) (Payment ID) (true/false: use ESR reference no.) (true/false: XML header with Schema Location) (true/false: Remittance information as SCOR) (true/false: Payment Type Information on transaction level) (true/false: instant credit transfer) (Service Level (only values from selectbox allowed)) (true/false: create PDF report) (true/false: SWIFT confirmation) (country code) (Split file after x payments) (true/false: AccountHolderInFileHeader) (AddressLine1) (AddressLine2) (true/false: AddSoftwareNameAndVendor) (true/false: CountryCodeFromIBANToBIC) (true:/false UseStructuredAddressFormat) (regulatoryReportingCode)
- Parameters with spaces must be set between quotation marks
- If an optional parameter is used, ALL optional parameters have to be set!
- After expiring of the evaluation period on a server system the pro license can be used instead of SCT/SDD once to save it.
Direct Debits
SEPAAppConsole.exe SDDx [configFileName] [importFileName] [exportFileName]
- [configFileName] You can create the config file in the window “Optional settings” according you actual configuration on the GUI.
or
SEPAAppConsole.exe SDD [accountHolder] [IBAN] [BIC] [collectionDate] [creditorId] [subformat] [flagForBICImport] [flagForEndToEndIdImport] [flagForCurrencyImport] [flagForAddressImport] [flagForAccountingDateImport] [flagForDirectDebitTypeImport] [flagForConvertTextToSWIFTCharacterSet] [flagForAllowSpecialCharactersAndUmlauts] [flagForAllowSpecialCharactersCH] [importFileName] [exportFileName]
- Subformat = PAIN_008_001_02 OR PAIN_008_003_02 OR CBISDDReqLogMsg OR PAIN_008_001_02_CH_01 OR PAIN_008_001_02_AUSTRIAN_003 or PAIN_008_001_02_AUSTRIAN_004 or PAIN_008_001_02_CHSDD_02 or PAIN_008_001_02_CH_03 or PAIN_008_001_01
- flagForBICImport = true or false, flagForEndToEndIdImport = true or false, flagForCurrencyImport = true or false, flagForAddressImport = true or false, flagForAccountingDateImport = true or false, flagForDirectDebitTypeImport = true or false, flagForConvertTextToSWIFTCharacterSet = true or false, flagForAllowSpecialCharactersAndUmlauts = true or false, flagForAllowSpecialCharactersCH = true or false
- optional (“” for empty/not used):
(Direct debit type (ERST, FOLGE, EINMAL, LETZT) (Direct debit kind (CORE, COR1, B2B) (Category Purpose (only values from selectbox allowed) (Identification ID) (true/false: Identification ID is person) (true/false: Identification ID is organisation) (true/false: TimeZone in Timestamp) (true/false: Generate Customer's referenz automatically (EndToEndId)) (Customer's referenz (EndToEndId)) (Batch Booking (EMPTY, YES, NO)) (true/false: Set transaction no.) (true/false: Payment Information Instruction for each payment) (Currency) (ChargeBearer (EMPTY, CRED, DEBT, SHAR, SLEV) (Payment ID) (true/false: XML header with Schema Location) (Split file after x payments) (true/false: AddSoftwareNameAndVendor)
- Parameters with spaces must be set between quotation marks
- If an optional parameter is used, ALL optional parameters have to be set!
- After expiring of the evaluation period on a server system the pro license can be used instead of SCT/SDD once to save it.